Ultrasonic plastic welding solutions for the automotive industry
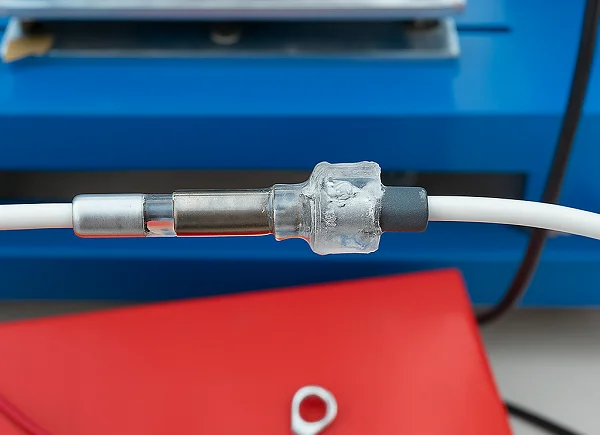
Ultrasonic welding machine for protecting automotive wire splices
VietSonic designs and manufactures systems that weld protective plastic housings around wire splices based on actual product samples. The solution focuses on precise positioning, parameter control, and consistent quality in repetitive production.
No adhesivesWelding at the joint interfaceProduct-specific fixturesAutomation-ready
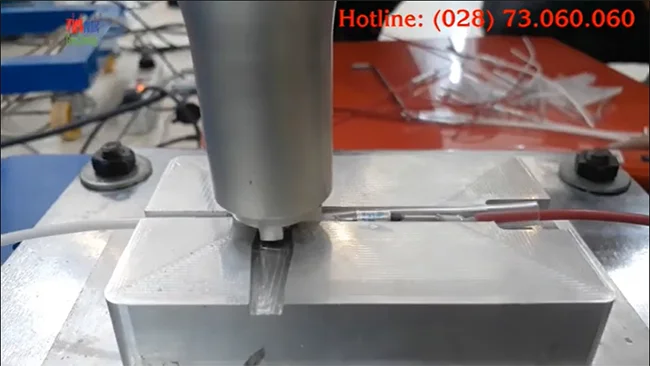
Actual production footage captured from the ultrasonic welding application video.
Production challenge
Manufacturers need to control both weld quality and the process
Wire splices in automotive harnesses often require a protective plastic housing to secure and shield the connection. As production volumes increase, adhesives, tape wrapping, or manual processes can add steps, curing time, and product-to-product variation.
01
Components must remain correctly positioned
Wires and plastic housings are small and can easily shift when the horn is activated. The fixture must hold the product securely without stretching, crushing, or damaging the wire.
02
Parameters must match the material
Amplitude, pressure, weld time, and hold time must be established through sample trials. Insufficient settings can result in incomplete sealing, while excessive settings can deform the plastic housing.
03
Quality must remain repeatable across production shifts
Manufacturers need a configurable, inspectable, and clearly documented process to reduce dependence on individual operator judgment.
Application principle
Ultrasonic plastic welding creates a bond directly at the joint interface
The horn transmits high-frequency mechanical vibrations into the plastic components held under pressure in the fixture. Internal friction causes the plastic to melt locally along the joint interface. Pressure is then maintained briefly so the weld can cool and solidify. Because heat is concentrated at the interface, the entire component does not need to be heated.
1
Load the product
The operator positions the wire splice and both halves of the plastic housing in the fixture.
2
Apply pressure and ultrasonic energy
The horn descends, applies pressure, and transmits energy into the plastic joint.
3
Hold after welding
The machine maintains pressure for the programmed time so the plastic bond can stabilize.
4
Inspect the product
The manufacturer evaluates appearance, bond strength, seal integrity, or durability according to its own standards.
The ultrasonic horn and fixture are designed around the geometry of the component.
Actual application video
Watch the welding process for an automotive wire-splice housing
The video shows how the component is positioned, how the horn moves, and how the product looks after the welding cycle is completed.
Manufacturing capabilities
VietSonic develops each machine around the manufacturer’s product and production process
An effective configuration depends on more than the ultrasonic generator. Operating quality is also directly influenced by the horn, fixture, pressing mechanism, wire positioning, and a parameter set validated on actual samples.
Evaluate samples before selecting the machine
The technical team reviews the plastic material, joint design, splice geometry, appearance requirements, and target production volume.
Design the horn and fixture
The horn must deliver energy to the correct area, while the fixture must support the product securely and allow convenient loading.
Optimize parameters using actual samples
Technicians conduct trials, observe defects, and adjust settings to establish a suitable operating window before handover.
Integrate the required level of automation
The machine can operate as a benchtop unit, a semi-automatic system, or connect to the feeding mechanisms and controls of an existing line.
Finished products must be evaluated against the manufacturer’s technical requirements.
Implementation process
From a wire-splice sample to a production-ready machine
A clear engineering process allows manufacturers to verify feasibility before investing and reduces the risk of major modifications when the machine is installed on the production floor.
01
Receive requirements
Collect samples, material information, production volume, and inspection criteria.
02
Conduct welding trials
Evaluate the joint design and the material’s response to ultrasonic energy.
03
Complete the mechanical design
Manufacture the horn, fixture, and machine mechanisms for the component.
04
Run production trials
Optimize the cycle and verify repeatable machine operation.
05
Handover
Provide the required operating, setup, and maintenance instructions.
Process parameters
Key factors that must be established through sample trials
A single parameter set should not be applied to every product. Each plastic material, housing size, and joint geometry requires a suitable operating window.
Factor
Role in the welding process
Signs that adjustment is required
Amplitude
Determines the vibration level transmitted to the joint interface.
Too low may result in incomplete bonding; too high may mark or deform the component.
Clamping pressure
Holds the two plastic surfaces in contact while energy is applied.
Improper pressure may misalign the component or create an inconsistent weld.
Weld time
Affects the total amount of energy delivered to the joint.
The setting must balance bond formation with the product’s appearance requirements.
Hold time
Stabilizes the component after ultrasonic energy is stopped.
Insufficient hold time may allow the joint to move before it has solidified.
Horn and fixture
Determine the direction of energy transfer and positioning accuracy.
They should be checked when the weld is offset, inconsistent, or bonded only in certain areas.
Operational value
The right solution helps manufacturers standardize protective-housing welding
Reduce process steps involving adhesives, solvents, or waiting for bonding materials to cure.
Establish a programmable welding cycle that is easier to train and control.
Reduce positioning variation with a horn and fixture designed for the component.
Make it easier to scale from standalone operation to semi-automatic or automatic production.
Gain direct technical support, maintenance, and recalibration from a local machine manufacturer.
Validation against the manufacturer’s standards is required
Vibration resistance, moisture resistance, pull strength, and seal integrity should not be concluded from appearance alone. VietSonic recommends sample trials and evaluation based on the technical criteria, test methods, and actual operating conditions of each project.
Send your wire-splice samples to VietSonic for a welding assessment
Please provide component samples, the plastic material, images of the joint area, projected production volume, and inspection criteria. The technical team will use the actual data to recommend a suitable machine configuration, horn, fixture, and level of automation.