



Faster, cleaner, and more stable highlighter pen cap welding for mass production
In highlighter pen production, loose caps, unsealed joints, misalignment, or poor surface finish do not only increase the defect rate. They also directly affect line productivity, inspection costs, and the ability to deliver orders on schedule.
An ultrasonic welding machine is a solution for joining plastic parts using high-frequency vibration, creating a bond at the contact area without glue, screws, or additional consumables in each welding cycle.
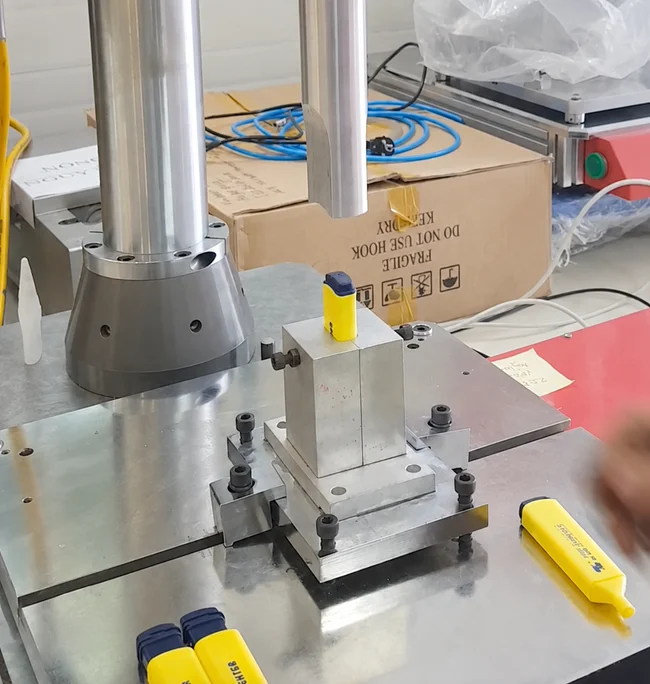
Common problems when welding or assembling pen caps manually
For small products such as highlighter pens, even a very small defect on the cap, body, or joining area can become a major cost when multiplied by daily output. When choosing a machine, B2B manufacturers do not only need a machine that “can weld”; they need stable welding, repeatability, and controllable quality during production shifts.
When the joining force is uneven or the contact area is not properly processed, the product may have a loose cap, visible gap, or may come apart during packing and transportation.
Using glue may cause smearing, excess adhesive, waiting time for curing, and difficulty maintaining consistent appearance across production batches.
Manual operation depends heavily on worker skill, leading to quality differences between shifts, operators, and production times.
How does ultrasonic welding solve this problem?
An ultrasonic welding machine generates high-frequency mechanical vibration and transfers it through the welding horn to the plastic part. Under the right pressing force, energy is concentrated at the contact area, generating localized heat and creating a bond between the pen cap and body, or the plastic assembly that needs to be welded.
The key advantage of this technology is that manufacturers can control parameters such as welding time, pressing force, amplitude, energy, and hold time. As a result, the welding process can achieve better repeatability compared with manual gluing, manual pressing, or mechanical fastening.

Video of ultrasonic welding applications in production
Key data to clarify before choosing a highlighter pen cap welding machine
The table below helps engineering, production, and purchasing teams quickly align with the supplier before deciding on the machine configuration.
| Information group | What needs to be confirmed |
|---|---|
| Part material | PP, ABS, PS, PC, or blended plastics. It is necessary to know the materials of the cap, body, and joining parts to evaluate welding compatibility. |
| Welding area size | Diameter, length, contact area, wall thickness, and the position where ultrasonic energy needs to be transferred. |
| Quality requirements | Mechanical strength, ink sealing, no visible gap, no surface deformation, and no impact on color or printed logos on the pen body. |
| Target output | Products per hour, shifts per day, number of pen models to run, and the desired automation level: manual loading with fixture, semi-automatic, rotary table, or line integration. |
| Defect control | It is necessary to identify current defects: cap detachment, cap misalignment, gaps, plastic cracking, surface dents, burnt edges, flash, or inconsistency between operators and shifts. |
Reference specifications for highlighter pen cap welding solutions
| Item | Recommended implementation |
|---|---|
| Machine type | Desktop ultrasonic welding machine for sample testing and semi-automatic production. It can be upgraded with a rotary table or multi-position jig if higher output is required. |
| Welding horn | Designed according to the actual shape of the cap or pen body, ensuring energy is transferred to the correct welding area without scratching the product surface. |
| Positioning fixture | The fixture must hold the product firmly, prevent rotation and off-center positioning, and allow quick loading/unloading in repetitive production. |
| Welding cycle | Usually optimized for a short cycle, which may be measured in seconds per product after sample testing and parameter optimization. Speed should not be guaranteed before actual samples are tested. |
| Parameters to save | Welding time, pressure, amplitude, energy, hold time, and pressing height if supported by the machine system. |
| Post-weld inspection | Pull force, sealing performance, appearance, alignment, cracking, and resistance to vibration or shaking during transportation. |
Comparison between ultrasonic welding, glue, pins/screws, and heat pressing
| Criteria | Ultrasonic welding | Glue | Pins/screws/mechanical pressing | Heat pressing |
|---|---|---|---|---|
| Operation speed | Fast, suitable for repetitive production | Requires curing or stabilization time | Depends on mechanical operation | Depends on heating and cooling time |
| Consumable cost | No glue, screws, or solvents required | Requires glue, dispensing nozzle, and adhesive quantity control | Requires pins, screws, or additional parts | No glue required but heat control is needed |
| Appearance | Clean weld if properly designed | Easy to smear or leave excess adhesive | Mechanical marks may appear | May affect the surface if heat is uneven |
| Automation capability | Easy to integrate with fixtures, rotary tables, and sensors | Difficult to maintain stable adhesive quantity | Requires additional pin/screw feeding | Can be automated, but the cycle is usually slower |
VietSonic’s recommended process for highlighter pen cap welding consultation
Sample receiving
Record material, dimensions, welding position, current defects, and target output.
Welding test
Set initial parameters and test different levels of pressing force, welding time, and energy to find a stable range.
Welding horn design
Recommend the welding horn and positioning fixture based on the product shape to reduce misalignment, defects, and improve repeatability.
Handover
Provide operation guidance, parameter saving instructions, post-weld sample inspection, and support for fine-tuning during production.
Checklist for purchasing and engineering teams
Before quotation
- Send images or videos of the current operation.
- Send samples of the cap, pen body, and parts to be welded.
- Provide plastic material information if available.
- Clearly state current defects and the estimated defect rate.
- State the desired output per hour or per shift.
Before finalizing the machine
- Inspect welded samples using pull force testing or basic impact testing.
- Evaluate appearance: no cracking, no dents, and no burnt edges.
- Check centering accuracy and stability across repeated welds.
- Finalize the fixture, welding horn, and automation level.
- Agree on operation guidance, maintenance, and after-handover support.
Need to test weld highlighter pen caps before investing in a machine?
Please send product samples, a video of the current operation, or a drawing of the welding area. VietSonic will support welding feasibility evaluation and recommend a suitable machine configuration, welding horn, positioning fixture, and automation solution based on actual production output.
Welding horn design
Parameter optimization
Production support
Contact VietSonic
Hotline: 0938 49 33 66
Email: info.vietsonic@gmail.com
Website: vietsonic.vn